This customer is working with fat clients managed by Intune, but also has 1000+ users working in Citrix. The request of the customer is to implement OneDrive in the Citrix environment, so the file server data (home folders), could be migrated to Microsoft 365. This way, the users working on fat clients and Citrix, can access their personal data in both environments.
Note: The simple fact is, that more and more of us adapt to new ways of working, and OneDrive is bound to come to your attention sooner or later. OneDrive is Microsoft’s horse in the Enterprise File Share race, and it is free with your Office365 entitlement.
Requirments
- Access to the destination: You must either be a global admin or OneDrive/SharePoint admin to the Microsoft 365 tenant where you want to migrate your content.
- Access to the source: Windows credentials that have read access to any of the network file shares you plan to migrate.
- Domain Service account for the agent (SharePoint migration agent)
- Domain Security group (this group will be configured on the new GPO)
We do not install the SPMT tool but use the new version of the SharePoint Migration Manager.
Important!! make sure you use the same folder language, in Citrix, fat-clients and OneDrive, otherwise you will get a foldername mismatch and the homefolder data will be migrated to different foldernames.
The settings and configuration of the tool and GPO’s are described in more detail in the following chapters.
Set OneDrive GPO Settings
You can set the storage limit for OneDrive for your organization, or per user if you like.
Sign in to https://admin.microsoft.com as a global or SharePoint admin.
- In the left pane, select Users > Active users
- Select the user
- Select the OneDrive tab
- Under Storage used click Edit
- Select the Maximum storage for this user option, and type the storage limit that you want to use

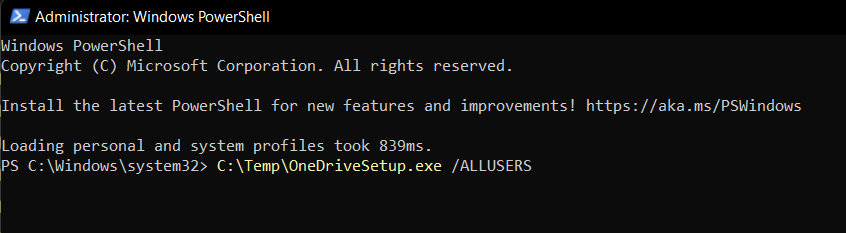
Installing OneDrive on Citrix
Firstly, to get the “machine installer”, you download the latest OneDrive client and then run it with the necessary switch (shown below)

SharePoint Migration Manager
All users using folder redirection must also be synced to Office 365. It must be checked whether they are members of the correct security groups and whether the rights are set correctly for the groups (users) within the tenant to use OneDrive.
Sidenote: check when using FSLogix Office containers, if the container size is large enough for OneDrive data. If the Office container is too small, the KFM migration will fail. Also, check-in the FSLogix GPO whether OneDrive Data Settings is set for the Office Container. If this is not the case, this must be carried out first!
The SharePoint Migration Manager can be accessed here (change tenant ID if needed):
https://(tenant-id)-admin.sharepoint.com/_layouts/15/online/AdminHome.aspx#/migration/fileshare
Migration Manager settings – Migrate to Microsoft 365 | Microsoft Docs
Migration Agents
A migration agent handles the migration tasks. The migration agent is installed on any server within the network, that has access to the user’s home folder.
Create a migration task
- Go to the Migration center in the SharePoint admin center, and sign in with an account that has admin permissions for your organization.
- Select Add task.
- Under Method, select either Single-source and destination or Bulk migration. If you have only a few file shares to migrate, select the single source and destination method. If you are migrating content from a large number of file shares, select bulk migration. 4. Under Source, enter the path to the file share that contains the content you want to migrate. Use the format \contoso\fileshare. Select Next.
- Example: Network locatie Homefolder: \\dfs-path\home
- Under Select a destination, choose SharePoint site, OneDrive, or Teams. Select Next.
- Enter the specific destination location:
- example: https://(tenant-id)-my.sharepoint.com/personal/firtsletter_lastname_(domain name)_nl
- OneDrive: Enter a OneDrive URL or an email address
- SharePoint: Enter the SharePoint site and document folder
- Teams: Enter the team name and channel.
- Select Next.
- Under Settings, enter a friendly Task name to identify your task.
- If you have Agent groups and want to assign this task to a specific group of agents, make your selection from the dropdown list. Otherwise, the task will be in the default group and be assigned to the next available agent. (Optional)
- Select All settings to make certain they’re set correctly for you. To learn more about specific settings, see Migration Manager settings.
- Select Run now. The task will be added to the list waiting for the next available agent. For each file share, you want to migrate, select Add task.
You can create a migration task manually or based on a CSV import file (not including a JSON file). Linking based on a security group and migrating these users is not (yet) possible.
A PowerShell script has been created to read the groups in Active Directory and convert these user objects into an import file that can be used in the SharePoint migration manager.
$groupname="ICT" #AD Security Group with all the users for OneDrive
$groupmembers = Get-ADGroupMember -Identity "$group" |%{get-aduser $_.SamAccountName | select SamAccountName, userPrincipalName }

Foreach ($member in $groupmembers)
{

#convert variable to string
  $memberSamAccountname = $member.SamAccountName.ToString()
  $memberUserPrincipalName = $member.userPrincipalName.ToString()

Write-Output "\\(DFS-Share-Homefolder)\$memberSamAccountname,,,$memberUserPrincipalName,documenten,," >> C:\Temp\SharePointCSVImportFile.csv

}
Check the exported CSV file if the users are correct. For example, it may contain guest users / service users or disabled users. You can remove the user line of the users you don’t need for migrating the home folders.
Import CSV File
- Go to https://(tenant-id)-admin.sharepoint.com/_layouts/15/online/AdminHome.aspx#/migration/file share
- Add task
- Select Bulk Migration
- Import the “sharepointSCVimportFile.csv that you created before
- Give the batch an easy name that is easy for you to distinguish
- Attention!! select the option “scan only”. You need to check, if all the files of a user can migrate
- After that, press “run now”
- The task is started
- After scanning, you can edit the migration task and disable “scan only”
- After that, you can start the migration task again and then the migration tool will transfer the files to OneDrive
Windows Group Policy
Make a copy of the User Policy (home folder redirection settings) and disable folder redirection is this policy. Example: if folder redirection is configured in a Default User Citrix Policy, you can make a copy that policy. Remove the Authenticated Users from the security scope of the copied GPO and link a security group, where you can add users that will be migrated to OneDrive.
Link the copied GPO to the correct OU (test servers). Also, make sure that the computer settings are allowed to be performed on the GPO.
Tip! you can use the variable %Onedrivesync%\Downloads for the download folder (this is not supported by Microsoft).
Citrix, OneDrive Policy
The previously indicated security group for adding users to OneDrive is linked to the new GPO for OneDrive. Example: “Default Citrix User Policy_Onedrive”. The OneDrive security group is linked to the existing GPO “Default Citrix User Policy”, on this GPO the OneDrive security group has a “Deny”. You can see this under delegation.
Next, you would need to configure OneDrive Files On-Demand via this GPO. This means that files won’t be downloaded into the user’s local cache until they are accessed by the user. However, architectural limitations mean that you can only use Files On Demand if you are using Windows Server 2019 or an upstream version of Windows 10 or Windows 10 Multi-User. The GPO for Files On Demand is located at Computer Configuration | Policies | Admin Templates | OneDrive Use OneDrive Files On-Demand.

Another important GPO is Block file downloads when users are low on disk space. This means that if a server or host is in a low disk space state that they won’t be able to cache any more files from OneDrive until the problem is resolved.

Another important GPO to configure is Storage Sense. This feature has a really useful setting that can “dehydrate” (essentially, delete the local copy of) files that have not been accessed for a defined period. This can keep the size of the OneDrive cache to a minimum. The GPOs are located at Computer Configuration | Policies | Admin Templates | System | Storage Sense, and the main ones you are interested in are Allow Storage Sense, Configure Storage Sense cadence and Configure Storage Sense Cloud Content dehydration threshold.


There are more settings for the OneDrive migration you can find here.
Test Scenario
I have tested the configuration for OneDrive within the Citrix environment with several user accounts. As soon as you add a user to the security group and this user logs into his Citrix session, the OneDrive client is started. Once the OneDrive client has started, you will see a sync of the files that are synced to OneDrive. Once the sync is complete, the paths are also automatically adjusted underwater (C:\Users\%username%\OneDrive – Customer name) of the three well-known OneDrive folders:
- Documents
- Pictures
- Desktop
Tip! Do not add all the users at once to the OneDrive security group. Migrate small groups of users, because you do not want to drain down your network (you can set a speed limit for file sync bandwidth in the OneDrive policy settings).
Testing scenario and results
- Thorough testing with an average of 8 to 10 users on the test server. This way, you can monitor if the write cache disk of Citrix is not increasing too much
- Result: We have now put multiple users on OneDrive and no-cache is written to the PVS cache disk
- Monitor FSLogix Profile disks as users are migrated to use OneDrive. We’ve already found out, that if we let the OneDrive client do the sync and don’t use the migration tool, the data goes straight into the FSLogix profile. This would negate the file-on-demand concept.
- Result: The advice is to first make a sync with the migration tool
- After good testing, you can link the GPO “Default Citrix User Policy_Onedrive” to the production OU.
- Reset the FSLogix Office Container
- Result: All files that are used in OneDrive, are stored on the FSLogix Office Container and will be lost (files still exist in OneDrive). When the user login Citrix after the reset, he must enter his e-mail address manually and indicate the use of the existing folders. OneDrive is back in sync.
- Transfer user using the migration tool for Sharepoint, while the same files already exist on OneDrive
- Result: Duplicate files are created
Troubleshoot and Monitoring Scripts
- OneDrive License check
get-msoluser -All | ? {$_.islicensed -eq $false} | Export-Csv -Path C:\Temp\No_Lic_Users.csv - Check whether the correct registry settings for OneDrive are present in the Citrix sessions for the user(s). (Adjust the path for the out-file):
Tip: If the registry settings are not present, you can assume that OneDrive is not working properly for the user. A reset of the Office container should solve the problem.
Set-ExecutionPolicy Unrestricted

$usernname = whoami
$register= Test-Path "HKCU:\software\Microsoft\OneDrive\Accounts\Business1"
$datetime = (get-date).toString("r")

$tofile = $usernname, $register, $datetime -join ';'
$Pathje = "\\DFS-Path\" + $usernname + "_log.txt"
$tofile | Out-File -FilePath $Pathje -Append
- Check whether the KFM migration has been completed and all folders have been redirected to OneDrive (adjust the paths to the customer enviroment)
Set-ExecutionPolicy Unrestricted

$username = [Environment]::UserName

if (Test-Path "C:\Users\$username\OneDrive - tenantid-customer\Desktop") {
   $folderdest01 = "True - Desktop"
} else {
   $folderdest01 = "False - Desktop"
}

if (Test-Path "C:\Users\$username\OneDrive - tenantid-customer\Documents") {
   $folderdest02 =  "True - Documents"
} else {
   $folderdest02 =  "False - Documents"
}

if (Test-Path "C:\Users\$username\OneDrive - tenantid-customer\Pictures") {
    $folderdest03 = "True - Pictures"
} else {
    $folderdest03 = "False - Pictures"
}

$datetime = (get-date).toString("r")

$tofile = $username, $folderdest01, $folderdest02, $folderdest03, $datetime -join ';'

$tofile | Out-File -FilePath "\\DFS-Path\_logfiles\kfm_state_folder_log.txt" -Append
Summary
This was my first project migrating Home Folders to OneDrive for users who work on Citrix. It was a challenging project but learned to allot from it. How to install and configure OneDrive caching for FSLogix will be a different post, you can follow the installation steps here. If you have any questions, please let me know!
we have the same kind of requirement with GCC G5 license. so should we go by FS logix for caching of user profile and data.
We would be really grateful if you help us with our query.
you can even reply to : akamlekar47@gmail.com
My next post will be about FSLogix. I hope I can post it at the beginning of next week!
Thanks for the helpful article, also I would share my thoughts in this field!
To migrate files from Citrix to OneDrive, there are several steps you can take:
1. Plan the migration: Before you start migrating files, it’s important to plan the migration process. This includes identifying what data needs to be migrated, what the structure of the new OneDrive implementation will look like, and how you will handle any potential issues that may arise during the migration.
2. Choose a migration tool: Migration tools can automate the process and help you avoid potential errors. Two popular migration tools are Gs Richcopy 360 and Carbonite.
3. Test the migration: Before migrating all of your files, test the migration process with a small batch of files to ensure it works as expected.
4. Migrate the files: Once you have tested the migration process, you can start migrating your files from Citrix to OneDrive using your chosen migration tool.
Gs Richcopy 360 is a file copying and migration tool that can help you move files between different locations, including Citrix and OneDrive. It offers features such as multi-threaded file transfer, file compression, and error handling to ensure a smooth migration process.
Carbonite is a cloud-based backup and recovery tool that can also be used for file migration. It offers features such as automatic backup, file versioning, and remote access to files, making it an ideal tool for businesses looking to migrate their data to OneDrive.
Thank You