In this project, we need to migrate an existing Gemalto (Safenet) MFA environment (RADIUS) using the Citrix ADC, to Microsoft Authentication on Azure with the SAML Connector. The use of Cloud services is gaining traction rapidly. Organizations migrating to Microsoft’s Cloud offerings, such as Microsoft Office 365, have access to Azure AD and can therefore enable Single Sign-on across all SaaS apps. This can’t leave remote access to hosted applications through Citrix ADC (NetScaler) to stand out with a different authentication experience. I must say that it took me some time to build this, but here is the result! Always nice to build new things.
In this scenario, the configuration is for a fully working Citrix Virtual Apps and Desktop Environment (CVAD). To complete this configuration, you must have the following requirements.
- A fully working Citrix Virtual Apps and Desktop (CVAD) environment
- Citrix ADC (NetScaler) with Enterprise license (Minimum version 12.1 build 50+)
- Configured Unified Citrix Gateway
- Internal and external DNS (e.g. citrix.company.nl)
- Certificates (wildcard or named) for the Gateway and SAML configuration
- Existing Azure tenant with Azure AD base configuration (AADSync)
- Azure AD Premium license
- MS Authenticator App
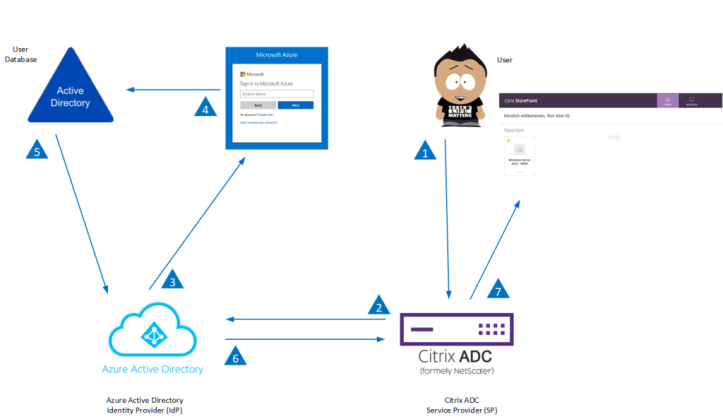
The following diagram depicts the SAML authentication mechanism.
The SAML IdP (Identity Provider) is a SAML entity that is deployed on the customer network. The IdP receives requests from the SAML SP and redirects users to a login page. The IdP authenticates these credentials with the user directory and then generates a SAML assertion that is sent to the SP. The SP validates the token, and the user is then granted access to the requested protected application.

Setup Citrix ADC SAML Connector in Azure AD
- On the Azure portal, click Azure Active Directory
- Under Manage section in the navigation pane, click Enterprise Applications
- In the search bar, enter Citrix ADC SAML Connector for Azure AD

- Under the Manage section, select Single sign-on
- Select SAML to configure single sign-on
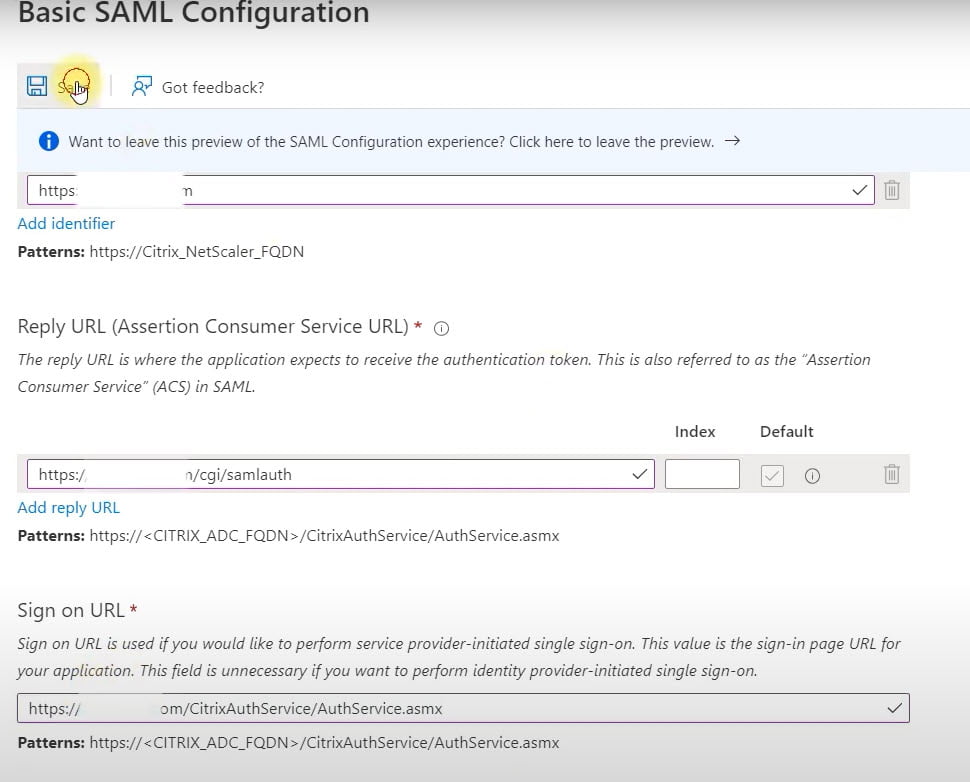
- Basic SAML Configuration
- Identifier (Entity ID)
- https://(Citrix Gateway Address).nl
- Reply URL (Assertion Consumer Service URL)
- https://(Citrix Gateway Address)/cgi/samlauth
- Sign on URL
- https://(Citrix Gateway Address)/CitrixAuthService/AuthService.asmx
- Identifier (Entity ID)
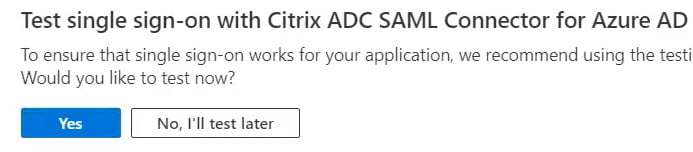
You can test the sign-on when the Citrix ADC is configured. So click on No, I’ll test later
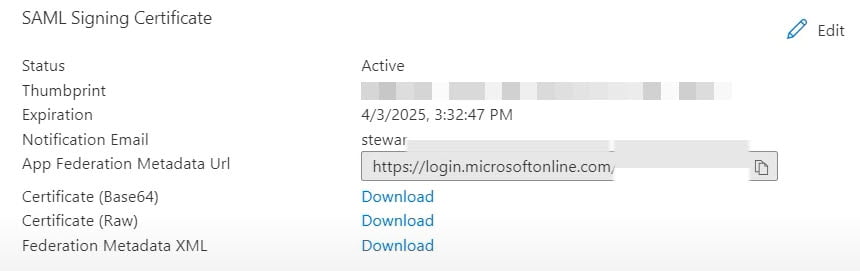
- Under SAML Signing Certificate, download the Certificate (Base 64) for the Service Provider (NetScaler / Citrix ADC)
- Now click on Add user/group to assign a user or group to grant access to the application

The configuration in Azure is now complete. Let’s proceed with the Citrix ADC configuration.
Install Identity Provider Certificate
The first step is to install the IsP certificate (Base64) you downloaded in the previous step, so we can configure this certificate when we setup the SAML Action later on.
- Log on to the NetScaler appliance
- Navigate to Traffic Management > SSL > SSL Certificate > CA Certificates
- Click on Install to install the IsP certificate you downloaded earlier
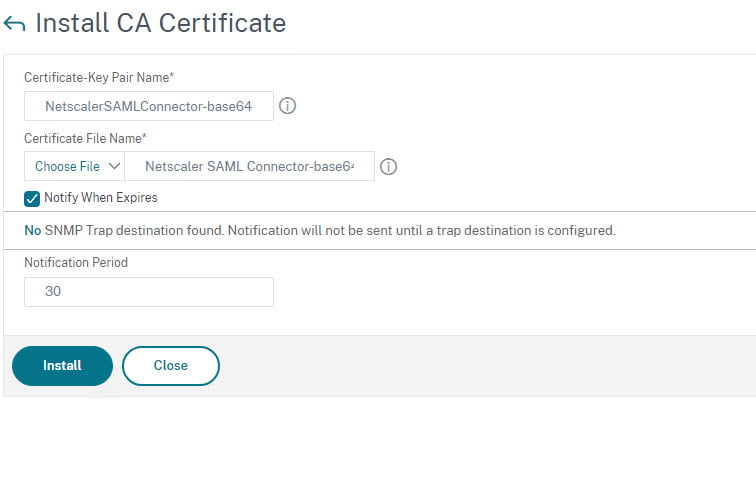
- You can find the certificate under Unknown Certificates

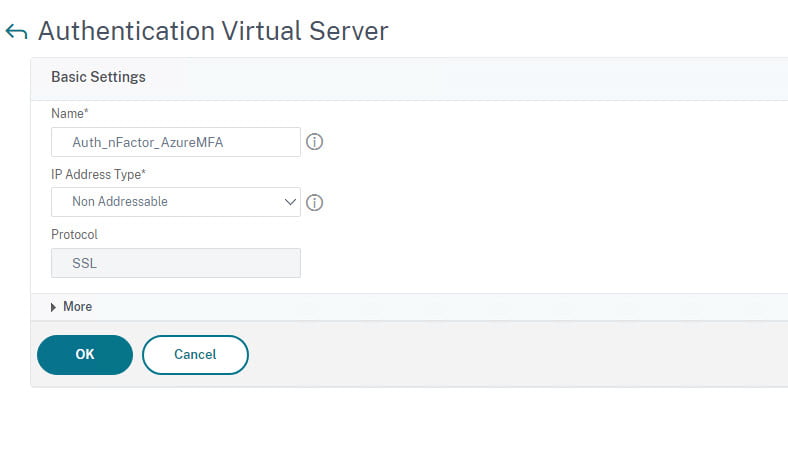
Configure a AAA Virtual Server
- Navigate to Security > AAA – Application Traffic > Authentication Virtual Servers
- Click on Add to create a Authentication Virtual Server
- Create a name for the server example: Auth_nFactor_AzureMFA
- Set IP Address Type to Non Addressable
- Click on Ok
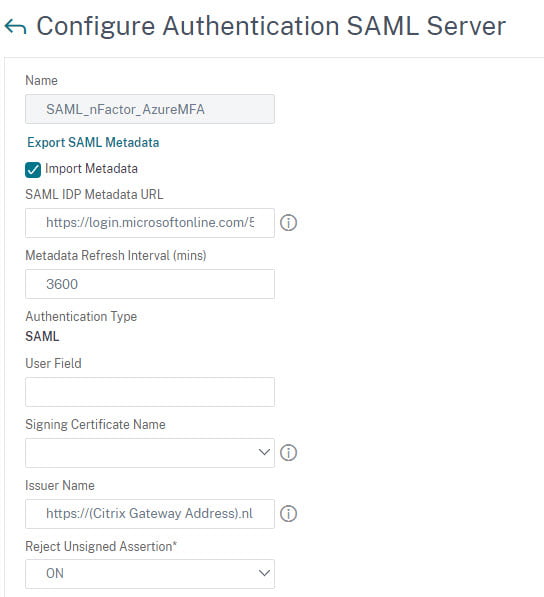
Configure SAML Actions
- Navigate to Security > AAA-Application Traffic > Policies > Authentication > Advanced Policies > Actions > SAML Actions
- Click Add to create the SAML Action
- Create a name of the server example: SAML_nFactor_AzureMFA
- Enter the SAML IDP Metadata URL
- Use the App Federation Metadata URL, this will pull all data from Azure
- Enter the Issuer name
- https://(Citrix Gateway address).nl
- Scroll all the way down and press OK
- Now open the SAML Action you just created
- Uncheck the checkbox Import Metadata (This will pull metadata from Azure, shown in below screen-print)
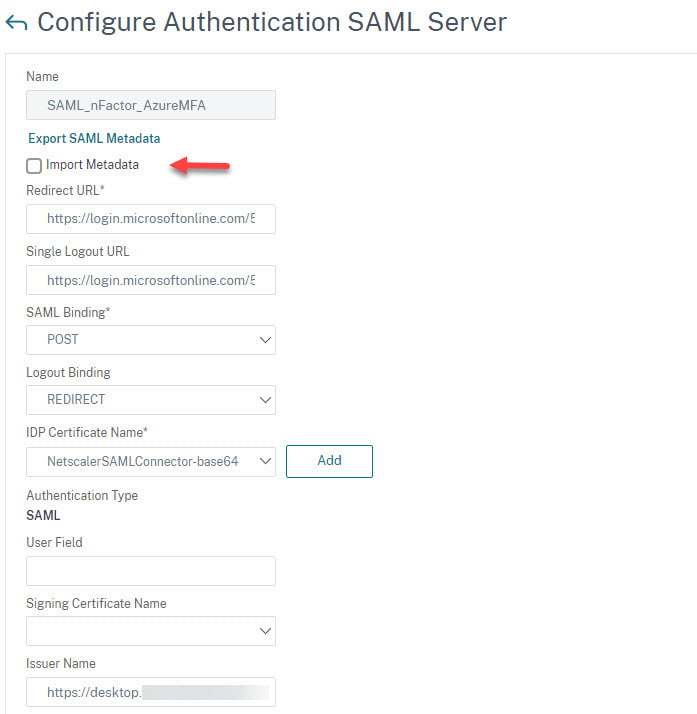
- Change the Logout Binding to REDIRECT
- Add the IsP certificate
- Enter the Citrix Gateway Address in the Issuer Name field
- Scroll all the way down and click OK
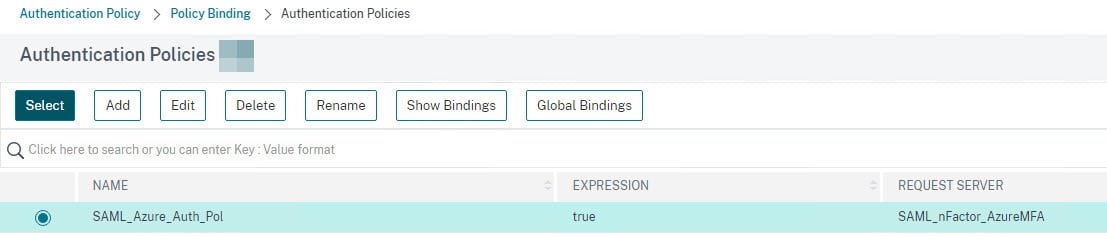
Configure nFactor Authentication Policy
- Navigate to Security > AAA – Application Traffic > Policies > Authentication > Advanced Policies > Authentication Policies
- Click on Add to create a Authentication Policy
- Create a name of the server example: SAML_Azure_Auth_Pol
- Change the Action Type to SAML
- Add the SAML Action
- Type True in the Expression field

Now we need to bind the Authentication Policy to the vServer.
Assign Authentication Policy to the Authentication vServer
- Go to Security > AAA – Application Traffic > Virtual Servers
- Now click under Advanced Authentication Policy on No Authentication Policy

- Click on Add Binding
- Select the Authentication Policy and click Bind
- Now click on No Server Certificate and Select the Gateway certificate (We use a wildcard)
- Click on Bind
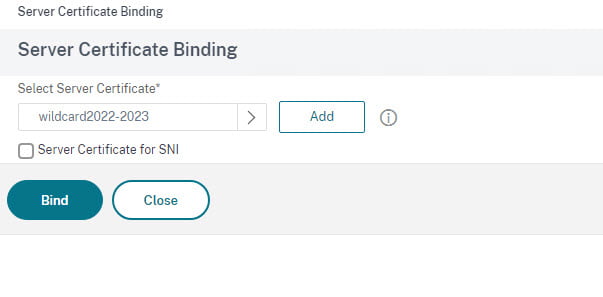
- Scroll all the way down and click on Done
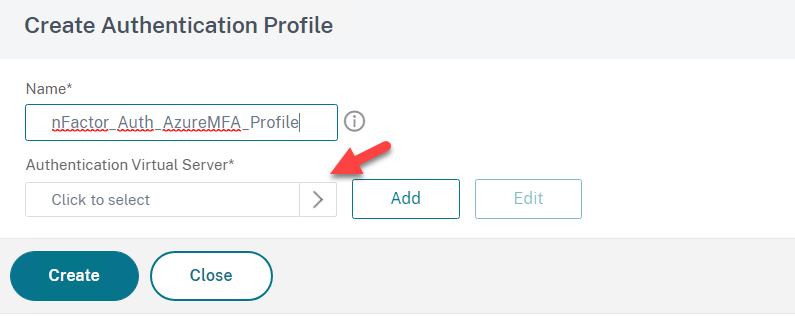
Create Authentication Profile and Assign to the Gateway
- Go to NetScaler Gateway > Virtual Servers > Edit your Gateway > Select Authentication Profile
- Click on + Authentication Profile

- Click on Add to create an Authentication Profile

- Create a name for example nFactor_Auth_AzureMFA_Prof
- Click to Select and add the AAA Authentication Virtual Server and click on Create
Configure StoreFront for Citrix Gateway SAML Authentication
Now we need to setup delegation for the Citrix ADC on StoreFront
- Open Citrix Studio or StoreFront
- Click on Stores
- Click on Manage Authentication Methods
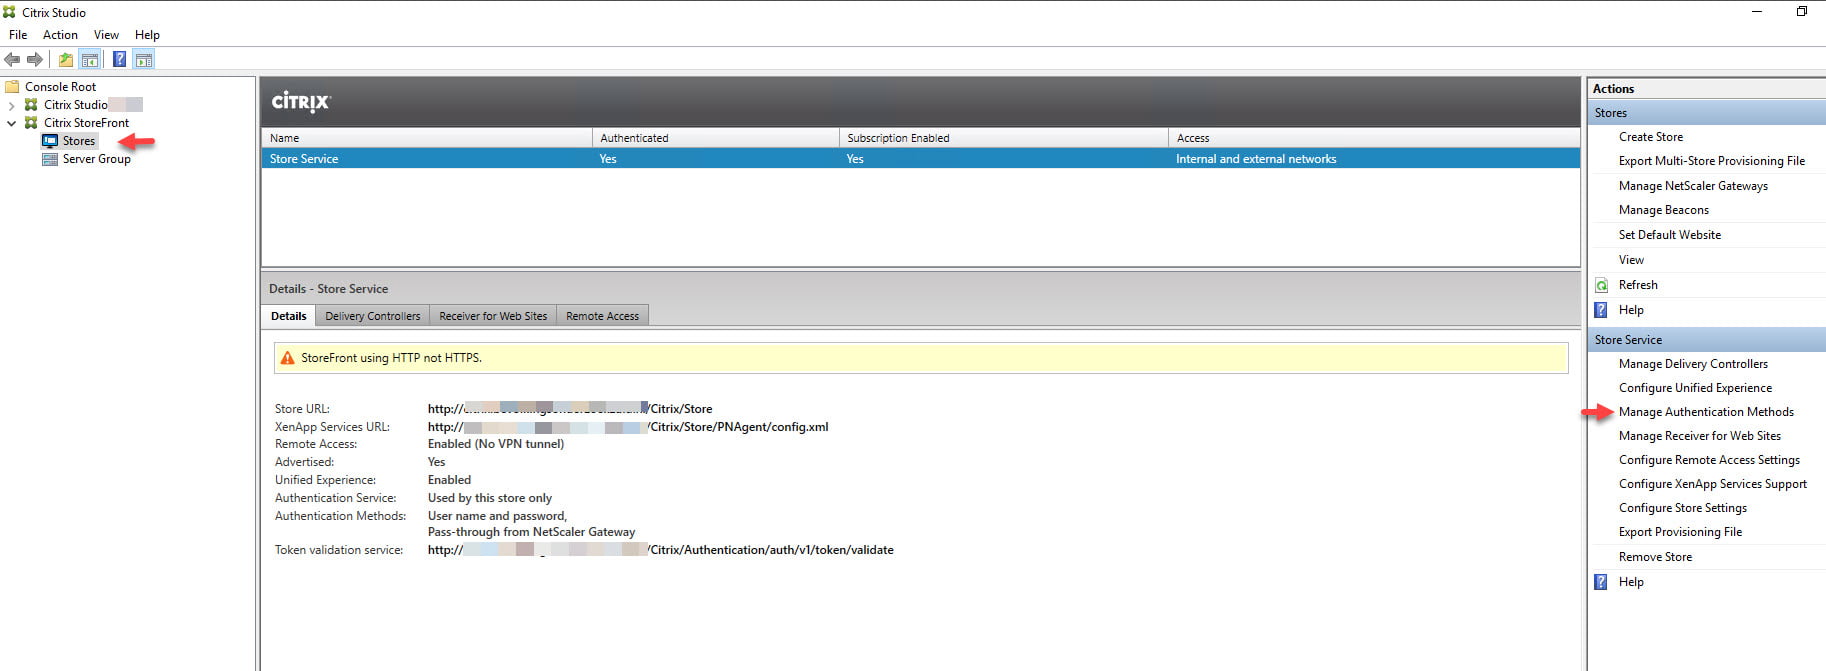
- Click on Pass-through from NetScaler Gateway
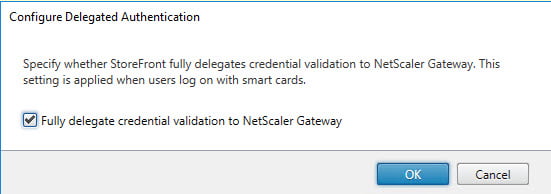
- Select Configured Delegated Authentication
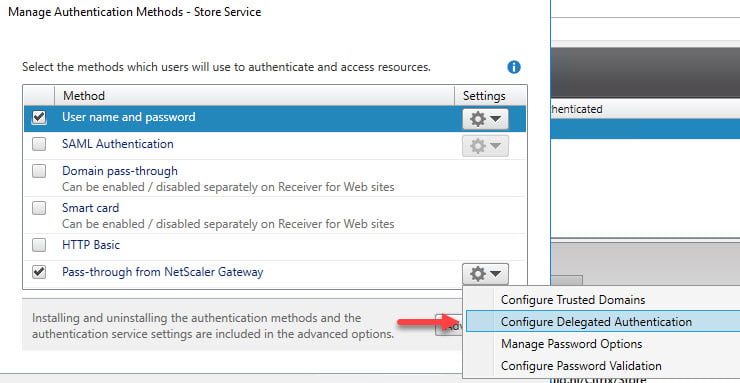
- Check the checkbox and click on OK
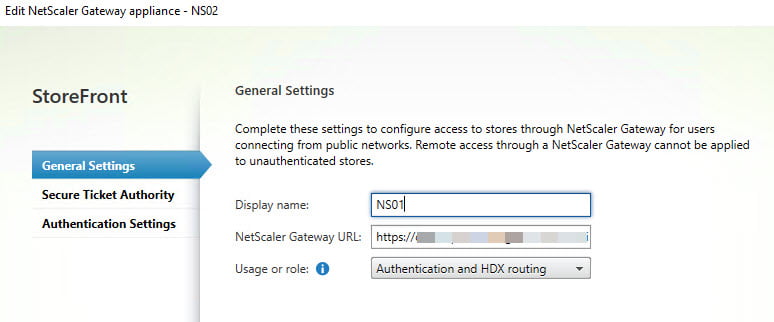
- Now click on Manage Citrix Gateways in the Actions section
- General Settings
- Display Name: NS01 (Any given name)
- NetScaler Gateway URL: https://Citrix Gateway Address.nl
- Usage or role: Authentication and HDX routing
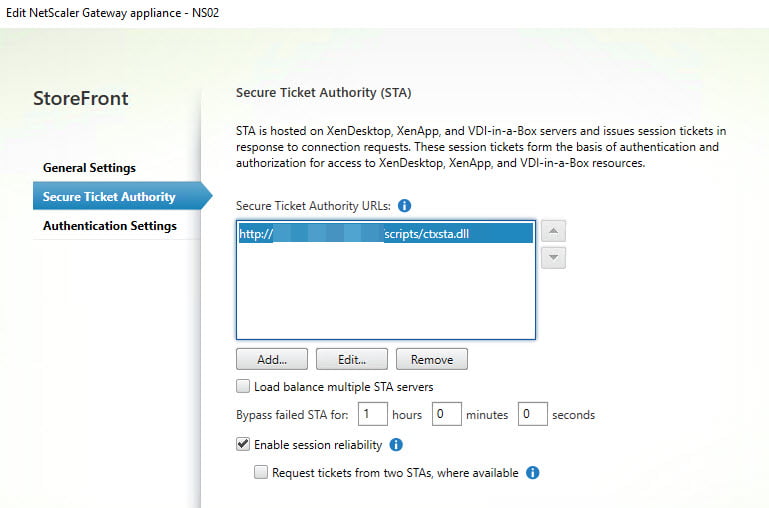
- Secure Ticket Authority (STA)
- STA URL: https://StoreFrontServerFQDN/scripts/ctxsta.dll
- Check Load balance if you have more StoreFront Servers
- Leave Enable session reliability checked
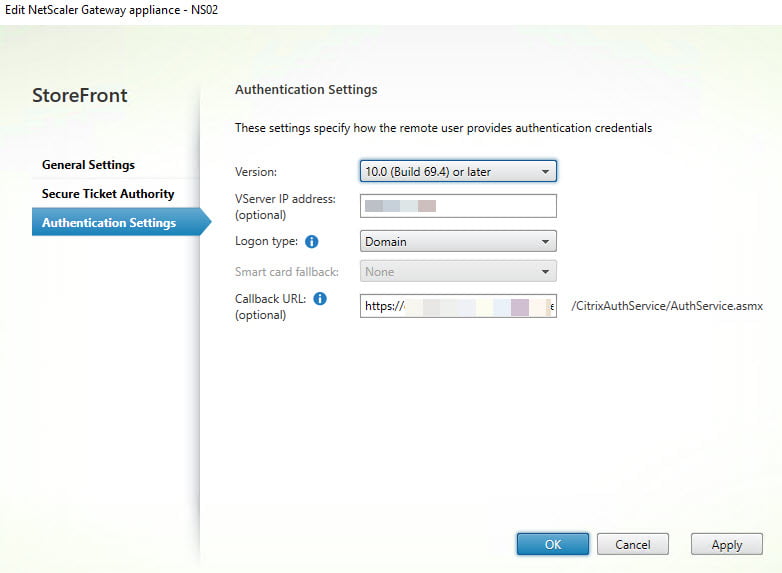
- Authentication Settings
- Version: 10.0 (Build 69.4) or later
- vServer IP Address (Optional)
- Logon Type: Domain
- Callback URL: https://Citrix Gateway Address.nl
- Click OK
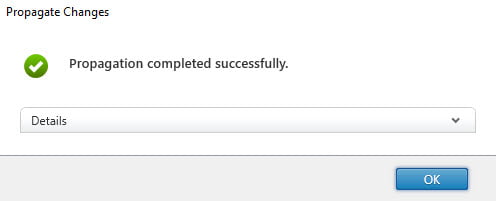
The last step is to propagate the changes in a redundant environment.
- In StoreFront click on Propagate Changes

- Click on OK
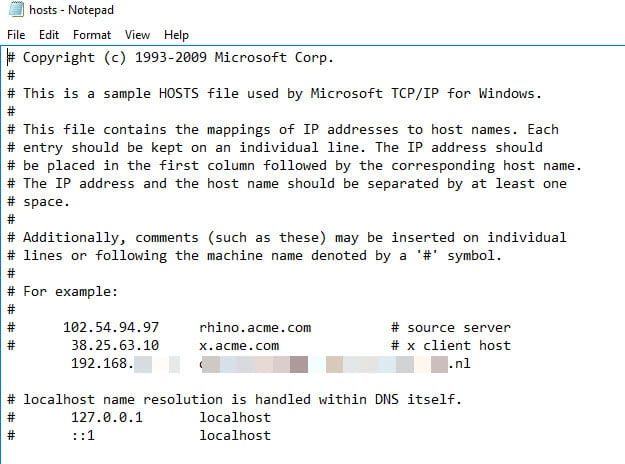
Note: Check if you can ping the Callback URL from the StoreFront server. You need to be able to resolve the Callback URL internally. In my scenario, I added the callback URL (Same as the Gateway URL) to the LM host file on the StoreFront server (you can also use DNS, but keep in mind when using DNS, that the NetScaler can be accessed internally). You can find the LM hosts file via C:\Windows\System32\drivers\etc.
Note: Azure AD does not expect the Subject ID field in the SAML request.
- For Citrix ADC to not send the Subject ID field, type the following command on the Citrix ADC CLI.
(nsapimgr_wr.sh -ys call="ns_saml_dont_send_subject). This command is only applicable in nFactor authentication workflows.
Summary
There are many different ways how you can set this up using nFactor. This configuration suits the need to be able to use MS MFA with SAML on Azure for this customer. You can add many additional steps using nFactor, you can always add these steps to the configuration we created here. Please feel free to ask any questions if you like. You can contact me by e-mail or leave a comment. Keep an eye out for more interesting blog posts!
Hey Sander,
Wil jij me jouw nieuwe 06-nummer en mail adres nog even doorgeven?
Jack
P.S. een klant heeft nFactor enabled gekregen, maar krijgt nu na invullen credentials een 2e pagina waar ze nogmaals e-mail adres en wachtwoord moeten ingeven alvorens ze MFA kunnen goedkeuren. Heb jij een idee?
Hey Jack,
Ik ben bang dat we dan toch FAS moeten gaan inrichten lijkt het.
https://www.deyda.net/index.php/en/2022/08/18/saml-authentication-between-citrix-microsoft-with-azure-mfa/
We have to do second authentication when we hit the storefront. How can we seamlessly log on without doing the authenticate at the Storefront level?
Unfortunately, I experienced the same issue but did not have the time to troubleshoot it properly. Did you configure domain pass-through on StoreFront?
Otherwise, we do need to set up FAS to get the full seamless experience.
https://www.deyda.net/index.php/en/2022/08/18/saml-authentication-between-citrix-microsoft-with-azure-mfa/#Citrix_Federated_Authentication_Service_FAS
Hoi Sander, erg interessante info! Gefeliciteerd met je nieuwe certificaat trouwens! Ik kom graag in contact met je. Via LinkedIn heb je een verzoek ontvangen.